Webcam Backgrounds And Green Screen Keying
Remove, blur, or key the webcam background after recording.
Webcam background controls are timeline edits. You do not need to get the camera perfect during capture.
Use these controls when the camera track is useful but the room, chair, wall, or green screen should not dominate the final frame.
Choose a background mode
Fraime.it supports three webcam background modes:
- Normal keeps the camera track unchanged.
- Remove Background uses person segmentation to isolate you from the room.
- Blur Background softens the room while keeping the original environment visible.

First place the webcam: turn PiP on, set its size, choose a shape, and drag it in the preview.
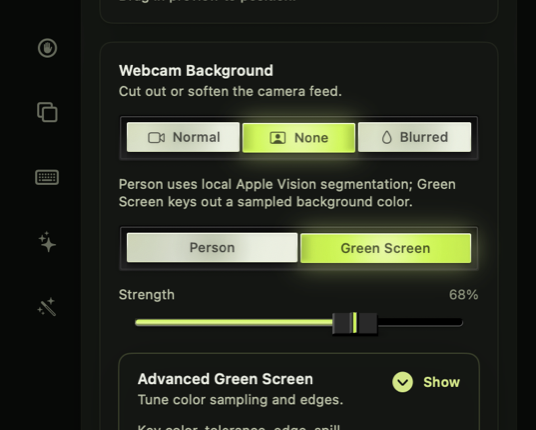
Then choose how the background is treated: normal, blurred, person segmentation, or green screen.
Use Remove Background when you want the camera to feel like an overlay. Use Blur Background when the original room is acceptable but distracting. Keep Normal when the webcam already looks intentional.
Use green-screen keying
If you recorded in front of a chroma backdrop, switch the matte method to Green Screen. Pick the key color from the preview or use auto-detect, then tune the matte.
Green-screen keying works best when the backdrop is evenly lit and visibly different from clothing, skin, and hair. If your background is not a real chroma screen, person segmentation is usually the better starting point.
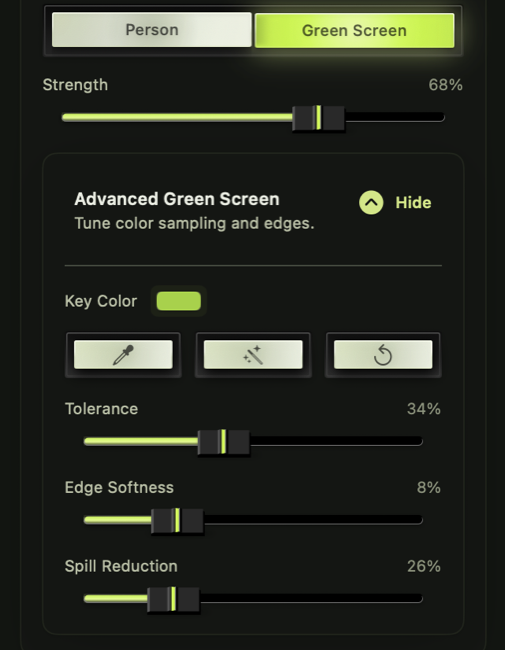
Advanced tuning is for cleanup.
Start by sampling the key color, then adjust tolerance, edge softness, and spill reduction until hair, shoulders, and hands hold up in motion.
Tune the matte
Use the inspector controls to adjust:
- Strength for the overall keying amount
- Tolerance for how wide the color match should be
- Edge softness for smoother outlines
- Spill reduction for reducing green color bleed
Start with key color and tolerance. Then adjust edge softness for outline quality and spill reduction for color bleed around hair, shoulders, and hands.
Crop before placing
If the webcam source includes empty space, crop it before final placement. A tighter camera frame often looks cleaner in picture-in-picture layouts and leaves more room for the screen recording.
Preview before export
Preview the camera track at a few points in the timeline. Look for hair, hands, transparent edges, and color spill. The same compositor is used for export, so the preview is the best guide to the rendered result.
Check both still moments and motion. A matte can look good when you are still but break around hands, headset cables, or fast movement.
Pair with Shorts
The Shorts template can combine background removal with a vertical picture-in-picture webcam layout, which is often cleaner than leaving the full room visible in a narrow frame.
Troubleshooting
If the background is still visible, increase tolerance gradually. If parts of your face, shirt, or hands disappear, reduce tolerance or pick a more accurate key color. If the edge looks harsh, increase edge softness. If there is green tint around the subject, increase spill reduction.