Export Settings
Choose output format, codec, frame rate, quality, aspect ratio, and resolution.
Fraime.it exports a finished video from the current timeline state. Export includes timeline edits such as redactions, subtitles, webcam keying, overlays, watermark, keyboard HUD, cursor rendering, generated wallpapers, gradients, backgrounds, and audio mix.
Export is the point where timeline edits become a standalone video file. Watch a final preview before exporting if the project includes redactions, subtitles, webcam keying, or Shorts formatting.
Export from the toolbar
Use the editor toolbar Export button when the timeline is ready. The export sheet lets you choose file name, save location, format, codec, resolution, FPS, and compression. During export, Fraime.it shows progress and lets you cancel before the file is finished.
Export uses the current timeline state, including the project End time, aspect ratio, canvas background, generated wallpaper or gradient settings, overlays, watermark, subtitles, audio mix, redactions, cursor, keyboard HUD, webcam layout, zoom, and 3D punch.
Aspect ratio
Choose the project ratio from the editor toolbar before exporting. Fraime.it supports source/native, 16:9, Shorts 9:16, 4:3, 1:1, and custom ratios.
Use the Shorts template when you want a full vertical-video setup. Use manual ratio changes when you only want the canvas shape to change.
Format and codec
Use MP4 with H.264 for broad compatibility. Use HEVC when you want smaller files and know your publishing destination supports it. MOV is useful for some Apple-first workflows.
Recommended presets
- Tutorials and docs: MP4, H.264, 30 fps, 1920 x 1080, high quality.
- Smooth UI demos: MP4, H.264 or HEVC, 60 fps, 1920 x 1080 or higher.
- Shorts: MP4, H.264, 30 fps, 1080 x 1920, high quality.
- Quick review: MP4, H.264, 30 fps, lower quality or smaller resolution.
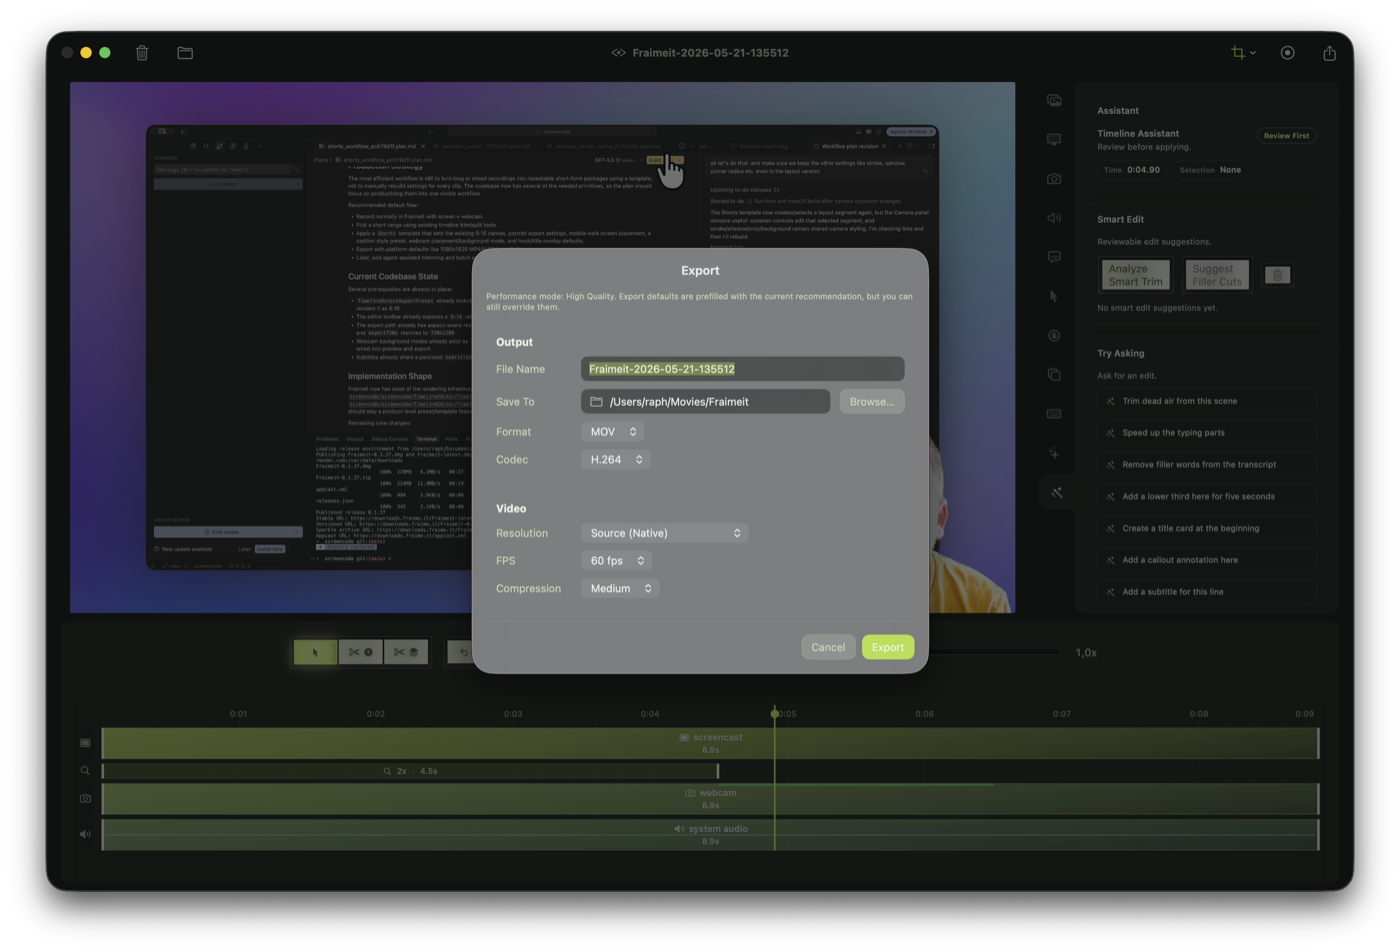
Export defaults follow the current performance recommendation, but you can still adjust file name, location, format, codec, resolution, FPS, and compression.
Frame rate
Choose the frame rate that fits the recording and destination. 30 fps is a good default for tutorials and Shorts. 60 fps can help when motion or scrolling needs to feel smoother.
Avoid exporting at a higher frame rate just because the option exists. If the recording was captured at 30 fps, a 60 fps export usually increases file size without adding real motion detail.
Resolution
Fraime.it supports aspect-aware presets, fixed sizes, and custom dimensions. Common choices include:
- 1920 x 1080 for standard 16:9 video
- 1080 x 1920 for Shorts 9:16
- 1080 x 1080 for square posts
- 4K-style presets when you need higher fidelity
Use source or aspect-aware presets when you want the export to follow the project canvas. Use fixed vertical presets when publishing to short-form platforms.
Quality
Higher quality increases file size. Use high quality for final publishing, and lower quality for quick review exports.
Export review
Before sharing the file, play the exported video and check:
- Redactions are visible and baked in.
- Subtitles render where expected.
- Generated wallpapers, gradient stops, and imported background images match the preview.
- Watermark placement and opacity match the preview.
- Webcam keying looks like the preview.
- Audio is present on the intended tracks.
- The aspect ratio matches the destination.
- The file opens in the target player or platform.
Export access
Export is part of the free tier. There is no export count limit, no watermark, and no account requirement.
A paid Pro plan is about the AI editing tools that shape the timeline before export, not about export access itself. Whatever is on the timeline exports, regardless of plan. See Billing, Plans, And Updates for what Pro adds.
Troubleshooting
If the export looks different from preview, re-open the project and check whether the relevant track or setting is enabled at the export time. If the file is too large, lower resolution, quality, or frame rate. If a platform rejects the upload, try MP4 with H.264 and a standard resolution.