Timeline Basics
Learn the main editing controls in the Fraime.it timeline.
The timeline is where a raw recording becomes a finished video. Fraime.it keeps screen, webcam, audio, subtitles, cursor, keyboard, overlays, redactions, and IDE context in one project so you can edit without leaving the app.
A good editing order
For most projects, work from broad edits to fine polish:
- Remove obvious setup time, mistakes, and dead air.
- Fix pacing with trims, splits, and speed changes.
- Add privacy redactions before you forget what is sensitive.
- Add subtitles, callouts, overlays, zoom, and 3D punch.
- Tune webcam, cursor, keyboard HUD, background, and audio.
- Choose export settings and watch a final preview.
Review the tracks
Use the track list to find the parts of the project you want to adjust. Common tracks include screen video, webcam, audio, subtitles, cursor, keyboard overlay, IDE context, zoom, 3D punch, annotations, overlays, and privacy redactions.

The editor keeps the preview, inspector, transport controls, and timeline tracks visible in one workspace.
Keep related tracks visually aligned while editing. For example, if a split removes a section of the screen recording, review nearby subtitles, overlays, redactions, and audio so they still land at the right time.
For a control-by-control overview of the editor, including transport controls, lane visibility, timeline tools, and the editable End time, see Timeline Editor Reference.
Transport and project length
The transport bar shows the playhead time and the project End time. The playhead time is for navigation. The End time sets the overall project length used for preview and export.
To edit the project length, click the right-side End number, type a time such as 1:20.00, then press Return or click away. Press Escape to cancel while editing. Changing End does not automatically ripple-trim clips or overlays, so review the final seconds after shortening a project.
Trim and split
Use trim and split controls to remove setup time, pauses, repeated attempts, or dead air. If you need to preserve sync, keep related tracks aligned while editing.
Use split when only the middle of a clip needs work. Use trim when the start or end is simply too long. If an edit changes the rhythm, play a few seconds before and after the cut rather than judging only the frame where the cut happens.
Most clips and lane items are timed by dragging their body or edges in the timeline. Annotation overlays and imported visual assets also expose exact Start, Duration, and End fields in the inspector when selected.
Need more footage after the first recording? Use the Media Library to import videos or record another screencast segment into the same project, then append it or insert it at the playhead.
Adjust pacing
Speed changes are useful for repetitive typing, waiting, loading states, or setup work that viewers do not need to watch in real time. Keep narration and important UI interactions at normal speed unless the speed change is part of the style.
Guide attention
Use zoom, 3D punch, cursor settings, callouts, lower thirds, title cards, and overlays to direct the viewer to the important moment. Preview changes before exporting so the final render matches what you saw in the editor.
Use one attention device at a time. A zoom, callout, cursor pulse, and keyboard HUD can all be useful, but stacking them on the same moment can make the video feel noisy.
For deeper guides, see Overlays, Annotations, And Assets, Zoom, 3D Punch, And Animation, and Cursor And Keyboard HUD.
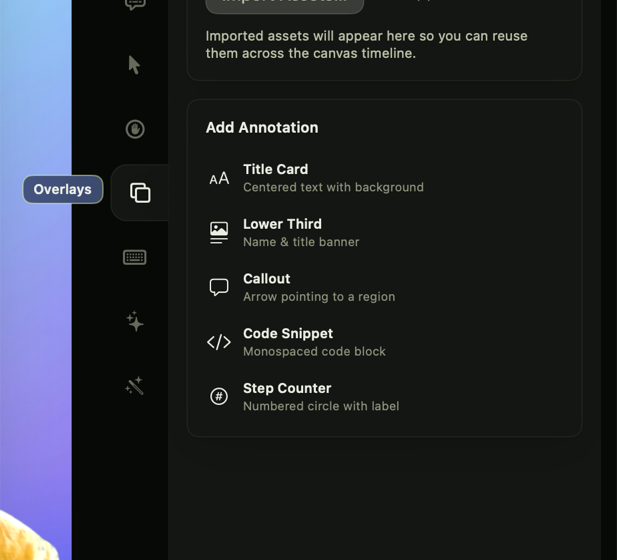
Overlay tools are for viewer guidance.
Add title cards, lower thirds, callouts, code snippets, and step counters when the viewer needs more structure than the raw screen provides.
Use the inspector
The inspector changes based on the selected feature. Use it for background framing, screen appearance, webcam layout, audio cleanup, subtitle styles, cursor behavior, privacy masks, overlays, keyboard HUD settings, IDE context, and assistant actions.
If you are not sure where a setting lives, select the timeline element or preview element first. The inspector is usually scoped to the selected part of the project.
See Inspector Reference for a tab-by-tab map of the editor controls.
Preview like a viewer
Before exporting, watch the video at normal speed and ask:
- Is the first ten seconds clear?
- Can a viewer follow where to look?
- Are secrets, tokens, or customer data hidden?
- Do subtitles cover important UI?
- Does the webcam block anything important?
- Are cuts, speed-ups, and transitions understandable?
Save and export
Fraime.it stores edits in the project package. Export creates a rendered video with timeline changes baked in, including redactions, subtitles, webcam mattes, overlays, and cursor or keyboard presentation.
When to duplicate a project
Duplicate the project before making a very different version, such as a full tutorial and a vertical launch clip. That gives you a clean way to keep separate pacing, subtitles, canvas settings, and webcam layout for each output.